You’re chasing a thin, foldable crust with a blistered edge. First you mix a high-hydration dough and rest it, then test a strong gluten window by stretch and fold, because flavor grows with time. Next you shape a thin, foldable crust with care. Then you top lightly with crushed tomatoes and a drizzle of oil, plus basil, so the crust shines. Stay with me and you’ll see how the oven gives the perfect char.
Dough Preparation and Hydration for a New York–Style Crust

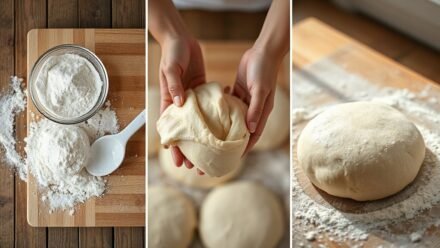
Mixing dough is where the magic begins. First, you measure flour and water with care, noting the hydration percentage, then rest the mix for an autolyse technique that lets starches wake up and gluten start kindly. You keep things simple and steady, and calm. Next, you choose a flour blend that feels forgiving, add salt later, and watch the dough hydrate gradually, so it binds smoothly without sticking your fingers and becoming a mess. You jot times and temperatures, then check notes at home. You test texture with a gentle poke, noting when the dough yields softly and returns, because proper hydration helps air pockets form and the crust bake true and crisp later. That’s enough for now; next comes shaping and resting, soon.
Kneading, Windowpane Test, and Fermentation
Stretching the dough and listening to its feel can tell you a lot before you ever bake. Now you knead until the dough gains strength and becomes smooth. You’ll test gluten development by gently stretching a small piece; it should form a thin, translucent windowpane when ready. If it tears easily, give it another minute or two, then fold and rest. Fermentation timing matters, so note how long the dough stays warm and active. During this rest, you’ll feel air pockets and a mellow aroma. Signpost: move to shaping only after windowpane passes and the dough has risen. If it feels slack, rewrap and wait; you are practicing patience, not rushing glory. With consistent practice, gluten development improves, and fermentation timing becomes more predictable.
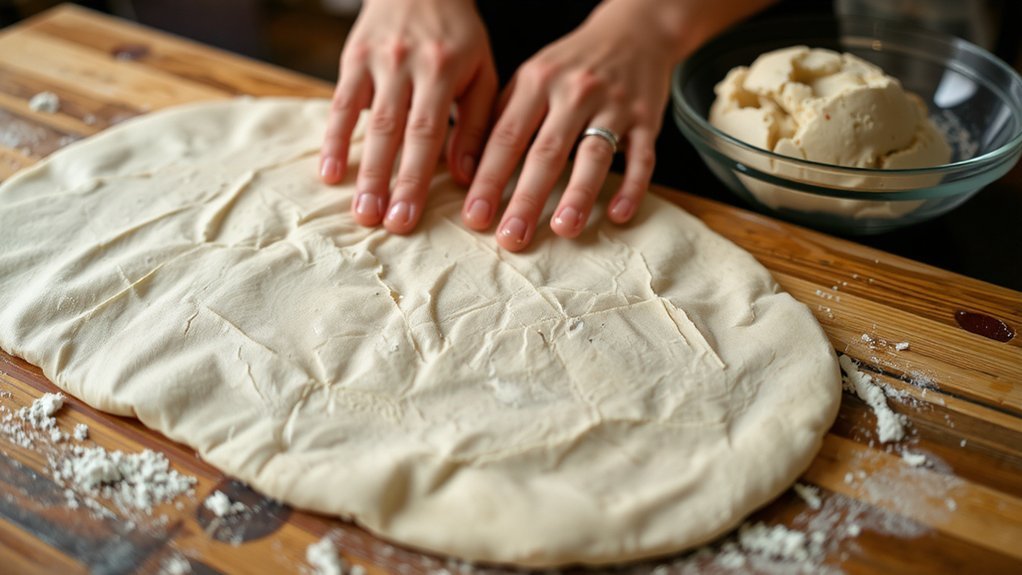
Shaping Techniques for a Thin, Foldable Crust

Now that the dough has rested, shaping becomes your next move to achieve a thin, foldable crust you can actually lift without panic at dinner.
With rested dough, shaping guides you toward a thin, foldable crust you can lift calmly.
Then you pat it flat and brace for practice.
Dough folding stays handy here, because it teaches you to balance Edge tension along the rim, preventing tight edges while you coax a whisper-thin center toward the pan.
Signpost: keep the process steady and listen to texture.
Next, rotate and rotate again, tilt as needed, and allow small air pockets to form; this medium-length step builds resilience for a truly foldable crust that you can.
If you mess up, smile at the mistake, adjust gently, and remember timing, heat, and patience shape the thin, charred edges you crave for tonight.
Tomato Sauce: Bright, Simple, and Quick

First up, we’ll brighten your tomato base with simple, fresh ingredients. Next, we’ll map a quick flavor build you can trust: bright tomatoes, a touch of garlic, a pinch of sugar, salt balanced to taste, and a drizzle of olive oil. Finally, I’ll share quick saucing tips you can actually use—some days I mess up, too.
Bright Tomato Base
Let’s start with a bright tomato base you can whip up in minutes. You mix crushed tomatoes with a pinch of salt, a splash of olive oil, and a whisper of sugar, tasting as you go to lock in tomato brightness. Acidic balance keeps it lively. If you tastes a touch flat, you can add a tiny squeeze of lemon or a few torn basil leaves, then simmer briefly to balance acidity and keep it bright. Give it a try. Keep tasting as you go. When you spoon on sauce, imagine the crust soaking in a glow, because this bright base wakes flavors without stealing attention from toppings or cheese. Practice makes better with pizza. You’ve got this, friend.
Simple Flavor Build
You already have a bright base in hand, and now we layer on flavor fast. Simple simmering keeps it bright, so you taste pure tomatoes with just a touch of salt and a whisper of olive oil. This is where savory basics show up as you add garlic, sugar, and torn basil leaves to wake the sauce. Then you balance with umami accents, squeezing in a quick splash of tomato paste and a tiny splash of bottled juice for depth. We signpost the finish by tasting and adjusting, keeping it bright and friendly, not heavy, so every bite feels like your own kitchen. If it seems thin, simmer briefly; if thick, loosen with a drop of water. Now you’re ready for the sauce build.
Quick Saucing Tips
Bright tomato sauce can come together fast.
You’ll learn simple tricks that keep flavor vibrant without fuss, and you’ll see how emulsion tricks keep oil from separating as you stir well.
First, warm your pan briefly and add crushed garlic for aroma carefully.
Next, pour in crushed tomatoes and a splash of water, then simmer gently toward a bright, smooth base.
Taste, adjust salt, and keep it loose enough to spread evenly.
If it looks thick, add a bit more water and stir; if it’s thin, cook a touch longer, not burned, just richer.
This is your quick launch, not a zoo of variables.
Remember to keep the sauce bright with a final stir, and save emulsion tricks for leftovers, because drizzle timing matters.
Cheese and Toppings That Don’t Weigh It Down

First, we start with lighter cheese options that melt well without weighing things down. Next, we talk about light, flavorful toppings like mushrooms, peppers, and a sprinkle of fresh basil, and you’ll learn to spread them evenly so slice stays balanced and not soggy. Finally, keep the toppings evenly distributed with a light hand, and yes, I’ll own my clumsy moments as part of the process.
Lighter Cheese Options
If you’re chasing a lighter pie, lighter cheese can help without stealing the crust’s shine. Begin with lowfat cheeses, then consider plant based options for variety. You’ll notice a lighter bite, but still keep melt and cohesion. This is step by step guidance, so we start with portioning and timing. Choose part skim mozzarella or a blend of mozzarella and cottage cheese. Alternatively, try plant based mozzarella or ricotta substitutes for a lighter texture. Remember density matters; lighter cheese means quick melt and crisp edges. Stick to thinner layers and resist piling more cheese than needed. We’ll shift topics later, but not yet, and stay focused on cheese. If you mess up, learn from it and adjust next bake. Keep notes and stay hopeful.
Light, Flavorful Toppings
Usually, you want toppings that lift flavor without weighing the crust down. Keep it light by choosing fresh toppings like mozzarella in small shreds, roasted peppers, and a few mushrooms, then ask where flavor can shine without crowding the slice.
Finish with a tiny splash of citrus zest and a handful of microgreen pairings, so brightness lifts the cheese without making the crust soggy or overwhelmed.
If you want extra punch, drizzle a light olive oil and choose toppings you can see clearly in each bite, then explain the balance to yourself like a friendly coach.
Now you know how to keep toppings lively yet polite, so every bite stays crisp and delicious, and you can still brag about your crust’s light, foldable charm.
Evenly Distributed Toppings
Spread the toppings evenly across the crust so every bite gets a fair share. Now, we talk about topping symmetry and how it keeps flavors balanced. If you scatter cheese haphazardly, you’ll end up with dry edges or soggy centers; aim for an even spread that covers the surface without pooling. That means rotate toppings in small sections, leaving gaps for airflow, and melt to run together without clumping, so every bite feels balanced and easy to chew. Next, keep the cheese layer light on top of sauce, then add vegetables in modest handfuls to prevent a heavy feel, making the crust still crisp. If you’re unsure, pause to check a cross pattern, adjust gently, and smile when the topping symmetry shines on pizza.
Assembling the Pizza: From Counter to Peel
Now you’re ready to move from the counter to the peel.
First, you crease the dough lightly on a floured surface, then slide it toward the edge while keeping your hands steady.
Next comes counter prep.
With a confident motion, you carry the dough toward the peel, keeping the surface dusted and the dough loose enough to slide without sticking.
If it sticks, you pause and coax it free.
Then you add toppings with calm hands and space, so every slice has a fair chance at char and crispness.
You test the edge and smile.
Next, signposting to the next stage, you acknowledge this move from counter to peel is almost finished and you’re ready to work with confidence today with patience and pride.
Oven Setup: Preheating to Ultra-High Heat
Set your oven to ultra-high heat and stay sharp.
You preheat with the oven empty, letting the heat sources rise steadily, so the stone or steel surface can grip the dough when you slide it in, every time.
That preheat matters most for crust texture.
Preheat shapes the crust’s texture above all.
Keep an eye on thermal insulation around the oven door, seals, and oven rack gaps, because better insulation means less heat loss and a steadier blaze toward ultra-high focus consistently.
If you notice drafts, adjust quickly and keep the air calm.
Signpost the steps by checking thermometer readings and baking steel readiness, so you stay confident, patient, and ready for a crisp edge without scorching the middle for you.
Stay steady, trust the process, and you’ll taste timing soon.
Baking Time and Achieving the Classic Char
You’ve preheated, so now let’s talk timing.
Bake your crust on a surface for a crisp edge, then watch for crust browning around the edges while the center stays soft to fold.
Keep the timer firm, not fussy, and trust your oven’s rhythm.
When the cheese bubbles and the bottom sounds hollow when tapped, you’ve got char development, so remove pie and let the heat settle before slicing.
If it seems pale, give it a few minutes more, not panic.
Signpost the next step by noting crust browning on the rim, then rest and plan to improve.
That balance between heat, timing, and patience shapes your classic bake.
Practice helps, and I’m cheering for you as you chase a perfect char.
You’ve got this.
Resting, Slicing, and Serving Like a Pro
Resting the pizza after it comes out matters.
Let it rest on a rack for a few minutes, then cut and serve while the cheese settles and the crust firms, so every bite feels balanced rather than wobbly.
Next, you choose your slice etiquette, and I nod along.
Think about slice etiquette as a code—serve timing matters, so offer hot slices promptly, but wait enough to steam escape and flavors bloom, avoiding soggy moments.
You handle the knife like a craftsman in training.
For serving, place slices on warm plates, and guide toppings with calm hands, so conversations stay easy and the meal feels shared, not hurried, like a friendly victory.
In short, rest, slice, and serve timing set the tone for everyone tonight.
Conclusion
And so, you’ve learned the craft, not rushed.
Like a town square at dusk, your dough rests, glows with possibility, and when you slice, the skyline of crust fractures into hopeful, light-edged alleys tonight.
Trust the heat; patience makes flavor rise, honestly.
If a step falters, breathe, regroup, and signpost your next move clearly, because precision guides the journey, and persistence brings that perfect char you crave tonight.
Keep tasting, sharing, and savoring the victory.