You can make restaurant-quality pizza at home with a few focused techniques and the right tools. You’ll learn dough hydration and fermentation timings, gentle shaping to preserve air, simple sauces, and baking methods that create a blistered crust. Follow these precise steps and you’ll be able to adapt recipes to your oven and schedule—next, master the oven tricks that make the difference.
Essential Tools and Equipment You Actually Need
If you want consistent, high-quality results, start by equipping your kitchen with a few purposeful tools. You’ll need a reliable oven that reaches 500–550°F; if yours tops out lower, use a pizza steel to retain heat. A baking surface (stone or steel) and a metal peel for transferring pizzas are essential; a wooden peel is helpful for assembling. Use a digital scale for accurate dough portions, a dough scraper to handle and divide dough, and a bench brush to clear flour. A long-handled thermometer verifies oven temperature quickly. Have a sharp pizza cutter or rocker and a sturdy cooling rack. If you mix by hand, a bowl and sturdy spatula suffice; if using a mixer, fit it with a dough hook and timer.
Choosing Ingredients: Flour, Yeast, and Pantry Staples
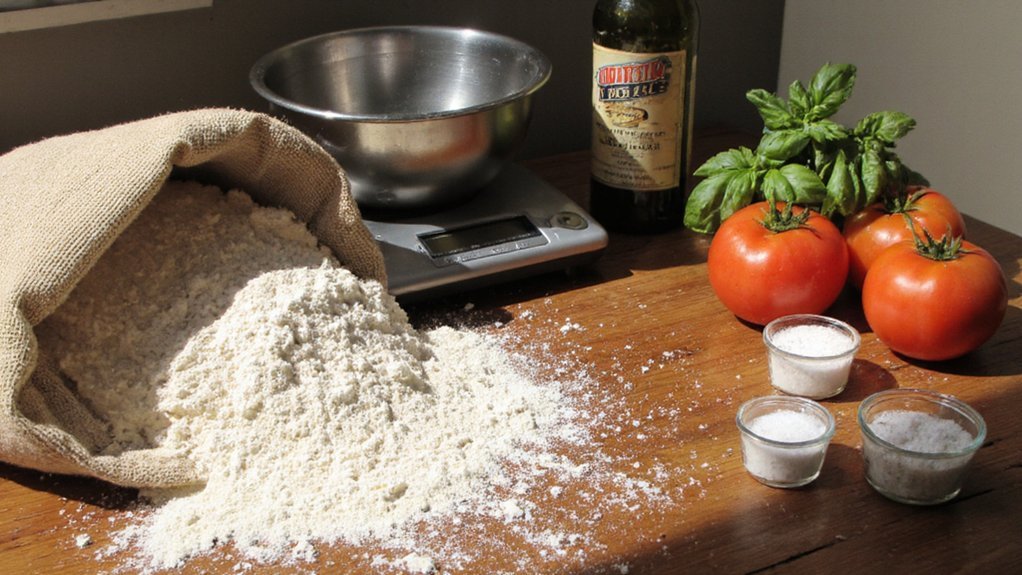
When you choose ingredients, aim for those that reliably produce the dough and flavor profiles you want: flour protein determines chew and structure, yeast controls rise speed and fermentation character, and a few pantry staples finish texture and taste. Pick bread flour (11.5–13.5% protein) for a chewy, open crumb; use 00 flour for softer, extensible doughs. For reliable fermentation use instant yeast for convenience or active dry if you prefer proofing steps; adjust quantity to room temperature and desired rise time. Salt is non-negotiable—use fine sea or kosher for even distribution. Olive oil adds softness and flavor; sugar or honey feeds yeast and promotes browning when desired. Keep flour fresh and yeast within expiration for consistent results. Measure precisely; small adjustments change outcomes regularly.
Foolproof Pizza Dough Recipe and Shaping Techniques

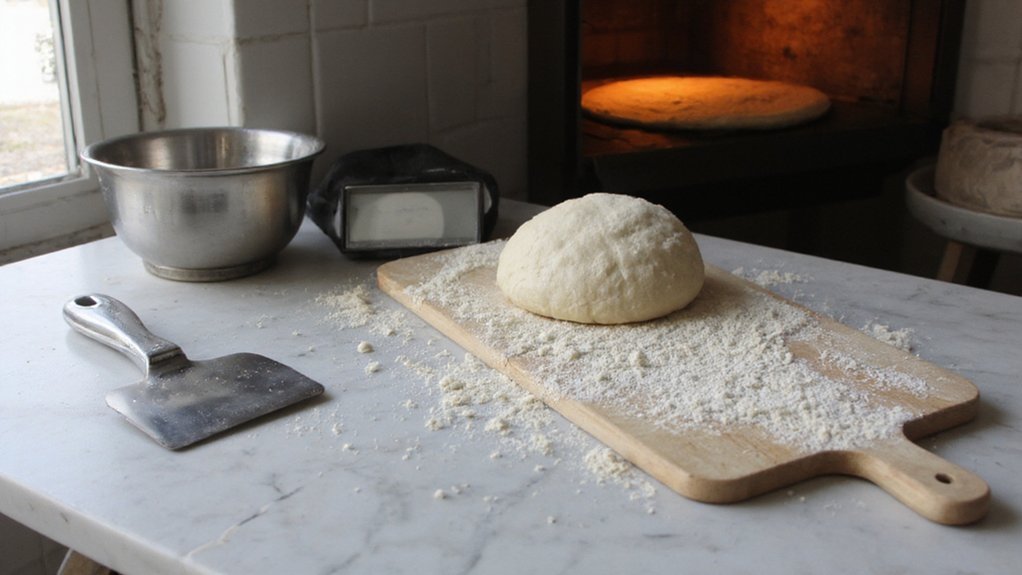
Start with a foolproof dough recipe that gives exact ingredient ratios and predictable yields. Mix until the dough is cohesive, then ferment it cold for at least 24 hours to develop flavor and gluten structure. You’ll use step-by-step stretching and shaping techniques to form a thin center and a well-rimmed, blistered crust.
Foolproof Dough Recipe
Mixing just flour, water, yeast, salt, and a little olive oil will get you a stretchy, easy-to-handle dough every time. Use 1000 g bread flour, 650 g water (65%), 20 g fine salt, 5 g instant yeast, 20 g olive oil for four 250–300 g balls. Weigh ingredients precisely; scale-based consistency beats volume guesses. After your resting period, shape with confident hands: press center outward, leave a defined rim, then stretch by knocking the edge and rotating. Avoid tearing; keep the center thinner than the rim. For a crisp, airy crust, finish on a hot surface. Follow proportions and shaping cues; you’ll produce predictable, restaurant-quality bases. Practice three times to build speed quickly.
- Proportions guarantee repeatability
- Rim-first shaping preserves bubbles
- Gentle handling prevents deflation
Mixing and Fermentation
Although the ingredient list is simple, precise mixing and controlled fermentation determine gluten development, gas retention, and final flavor — so you’ll pay attention to hydration, yeast quantity, salt timing, and temperature from the first fold. Measure ingredients by weight. Combine flour and water first for a 20–30 minute autolyse to hydrate flour and begin gluten formation; then add salt and yeast. Mix until dough gains cohesion, then perform gentle stretch-and-folds every 20–30 minutes during bulk fermentation to build strength without overworking. Track temperature: dough at 24°C ferments predictably; lower temperatures slow activity, colder retards in the fridge for 24–72 hours to improve flavor. When bulk volume roughly doubles, divide, pre-shape, and allow a short bench rest before final shaping and stronger gluten structure.
Stretching and Shaping Techniques
Working the dough gently after its bench rest preserves gas and lets you shape a thin center with a pronounced rim. Position the ball on a lightly floured surface, press from center to edge with your fingertips, and avoid deflating the outer ring. Use gravity and wrist motion to stretch: drape the dough over your knuckles and rotate while letting it fall, or lay it flat and push outward with palms. If tears appear, pinch and seal; let it relax for five minutes before resuming. For consistent results, aim for a uniform thickness and a 1 to 1.5 inch rim. Follow these focused techniques to control crumb structure and oven spring.
- Preserve gas for airy crumb.
- Controlled stretching guarantees even bake.
- Resting prevents tears.
Easy and Versatile Pizza Sauce Options
You’ll choose between a robust Classic Tomato Sauce and a Quick No‑Cook Sauce based on time and flavor. For the classic, simmer crushed tomatoes with garlic, olive oil, oregano, salt and a pinch of sugar until it thickens and tastes balanced. For the no‑cook, whisk high‑quality canned tomatoes or tomato paste with olive oil, minced garlic, chopped basil and salt, then let it rest so the flavors meld before spreading.
Classic Tomato Sauce
Often overlooked, a well-made classic tomato sauce is the backbone of any great pizza, and you can make one in under 30 minutes with pantry staples. Heat olive oil, sweat finely chopped garlic and optional onion until translucent, then add canned crushed tomatoes. Simmer 15–20 minutes, skim foam, reduce to a thick but spreadable consistency. Season with salt, black pepper, dried oregano, and a pinch of sugar if acidity is high. Cool slightly, spoon on dough; sauce can make dough soggy. Blend for a smooth finish or keep rustic. Taste and adjust. Store refrigerated 4 days or freeze. Follow these principles:
- Balance acidity with salt and a touch of sugar.
- Control moisture by simmering to proper thickness.
- Season early and taste again after simmering.
Quick No-Cook Sauce
Using high-quality canned tomatoes or tomato sauce, you can craft a bright, ready-to-spread pizza sauce in minutes without simmering. Drain whole peeled tomatoes briefly, crush by hand or pulse once in a blender for a slightly textured base. Stir in 1–2 teaspoons kosher salt, 1 teaspoon sugar if needed, 1–2 tablespoons extra-virgin olive oil, and a teaspoon of dried oregano. Add fresh minced garlic or garlic powder to taste and a pinch of red pepper flakes for heat. Taste and adjust acidity with a splash of red wine vinegar or lemon juice. Use immediately or refrigerate up to three days. Spread thinly on dough; it won’t over-saturate and keeps baking times predictable. For variation, stir in chopped basil, rosemary, or anchovy paste sparingly. Enjoy.
Topping Ideas, Layering, and Flavor Combinations
When you choose toppings, prioritize balance of texture, moisture, and flavor intensity so the crust stays crisp and each bite reads clearly. Start with a primary flavor (tomato, pesto, white sauce), add a protein for substance, and finish with contrasting accents like fresh herbs or a squeeze of lemon. Layer strategically: sauce thin, cheese moderate, proteins distributed, delicate ingredients added late. Control moisture by pre-cooking high-water vegetables and draining cured meats. Combine flavors using a rule: one dominant, one supporting, one bright. Use salt and acid sparingly to sharpen. Test small variations to learn pairings. Keep portions measured so oven time affects toppings minimally only.
- One dominant, one supporting, one bright
- Cook or drain wet ingredients first
- Scatter fragile toppings last
Baking Methods: Home Oven, Pizza Stone, and Grill Techniques
Although each method yields good pizza, you should pick the one that matches your equipment and desired crust profile: a hot home oven with a preheated stone or steel gives consistent radiant heat for a blistered, evenly browned crust; a baking sheet or directly on the rack works for thin-crust or sheet pizzas; and a gas or charcoal grill produces intense direct heat and smoky char for Neapolitan-style pies if you control flare-ups and use a two-zone setup. For the oven, preheat to maximum 45 minutes, slide the pizza onto hot surface and use top rack. With a stone or steel, heat longer; use a peel dusted with semolina. On the grill, sear over high heat then move to cooler zone to finish.
Common Mistakes and How to Fix Them
If you want consistent results, learn the typical errors home bakers make and apply specific fixes so you stop wasting dough and time. You underheat the oven, overload toppings, or skip proper shaping; each causes soggy, uneven, or tough crusts. Preheat thoroughly to the highest safe temperature and use a hot surface. Use moderate sauce and even, thinly sliced toppings. Handle dough gently: rest it, stretch don’t tear, and avoid excess flour that burns. Calibrate cooking time by watching color and firmness, not just the clock. Clean your stone or pan to prevent burnt flavors. Practice targeted adjustments rather than broad changes to isolate problems and build repeatable technique.
- Underheated oven: preheat longer and wait.
- Excess toppings: reduce and drain.
- Rough handling: rest gently.
Storing, Reheating, and Making Dough Ahead
Because proper storage and reheating preserve texture and flavor, plan your dough production and leftovers with clear temperatures, timings, and containers in mind. If you’re making dough ahead: mix, knead, and oil the ball, refrigerate in sealed container for up to 72 hours for controlled fermentation; for storage, freeze portions up to 3 months; thaw in fridge 24 hours before use. For storing baked pizza: cool to room temperature no longer than two hours, refrigerate in airtight container or wrap tightly; consume within 3 to 4 days. To reheat: use oven or skillet to revive crispness—preheat oven to 375–425°F (190–220°C) and bake 6–10 minutes, or heat covered skillet over medium until bottom is crisp and cheese melts. Always reheat to 165°F (74°C) promptly.
Conclusion
You’ve got the essentials: the right tools, weighed flour and 65% hydration, and a cold ferment to build flavor. Autolyse, handle dough gently to keep air, use a thin sauce and moderate toppings, and blast pizzas on a preheated stone or steel at your oven’s highest setting for blistered crusts. Practice prevents mistakes; refrigerate dough or freeze portions for convenience. Follow these steps and you’ll consistently make better pizzas at home with confidence and speed.