Did you know that about 1 in 10 people avoid gluten but still crave a real crust? In this guide you’ll learn a simple dough you can actually feel. First, gather a gluten-free blend, warm water, and a calm, patient stance. Next, hydrate slowly and fold gently, so the dough behaves. Rest warm, shape with steady pressure, par-bake briefly, and finish with toppings; the next steps reveal all.
Ingredients and Tools

First, grab your gluten-free flour blend and the basic tools you’ll need.
In this section you’ll pick ingredients and gear, and you’ll learn what to have on hand, from a mixing bowl to a spatula too.
> Choose ingredients and gear, learn what’s on hand, from mixing bowl to spatula.
You’ll notice easy substitutions.
Think about ingredient substitutions, like swapping gluten-free blends for different recipes, and record what works, so you can repeat good results without guesswork next time.
Tools stay neat and ready.
Good tool maintenance keeps you confident, so wipe blades, rinse bowls, and store measuring spoons in a labeled drawer to save minutes and avoid mixups.
Signposts help you switch topics.
Now we move to what you’ll gather, from dry blends to a salt and oil, with notes on how each item supports flavor and texture.
Hydration and Mixing Technique

Now that you’ve got your dry mix and tools, hydration comes next.
First, you measure water slowly, because water absorption changes with each flour blend, and you’ll feel your dough loosen at its own pace while you stay mostly calm.
Next, mix with gentle folds and light pressure.
That’s where kneading dynamics come in, not like heavy bread work but enough to coat grains and distribute moisture so every bite feels forgiving and hold together, not gluey.
If it sticks, rest it and rehydrate briefly.
Signpost: now you’re balancing hydration, temperature, and mixing; you’ll adjust water or rest time as needed, and your confidence will grow as you notice the dough’s texture evolve.
This is the steady start before anything else.
You’re getting there.
Rise, Rest, and Gluten Structure

After your mix rests, you’ll see the dough start to wake up and a gentle gluten-like structure form, even in a gluten-free blend. This is where yeast timing matters, because patience helps the gluten network lift without overdoing it, so you don’t end up with a dense crust or flat center. Rest gives flavor and chew a gentle edge. During the rise, the dough expands slowly, and you should keep it warm enough to wake the starches, yet not so warm you lose shape. Check texture as you go. When you’re ready, the dough should feel airy and slightly tacky, a sign your gluten network has formed, even with gluten-free blends, and you’ll gain that confident stretch. Signpost to the oven with clear timing.
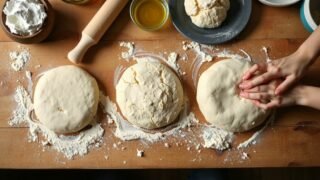
Shaping, Par-Bake, and Crisping

Shape the dough with confident, steady pressure to form a round, even base. You learn by feeling the edges soften and stop pulling apart. Now you move to shaping tricks that keep the circle intact. Gently stretch from the center outward, rotate, and check thickness with your fingertips. If it resists, rest it a moment and try again. This is where the par bake technique comes in, short and careful, not a full bake. Place the dough on a preheated pan and bake just until the surface looks set and pale. Next, slide it onto a rack to crisp the bottom evenly. Use a light sprinkle of cornmeal to prevent sticking. Finally, cool briefly before topping, keeping the texture light and chewy for balance.
Finishing, Topping, and Slicing

A finishing touch can transform a plain crust into something memorable. You’ll top while it’s hot, let the cheese melt, and listen for that faint sizzle that tells you the crust is finished, not burnt today. Next comes slice technique and slice flow. You’ll cut across the center first, then into wedges, guiding each slice with steady hands, so every piece shows even toppings. Serve it hot. For serving presentation, arrange slices in a circle or fan them on a warm plate, and offer a drizzle of olive oil or herbs to brighten flavor. Simple toppings keep things balanced. If a guest asks for seconds, you’ll mention the crispy crust, the even melt, and how the aroma invites another bite without overthinking texture tonight.
Conclusion
You’ve got this—gluten-free dough that feels like real pizza.
Remember, about 1 in 5 people avoids gluten, yet with careful hydration and patient folding, your crust can still offer chew, crisp edges, and a tasty, comforting bite tonight.
Take your time and listen.
Now, signpost your next steps: rest, shape with steady pressure, par-bake, then crisp, top while hot, slice across the middle, and savor with olive oil and good company tonight with friends nearby.