You’re about to master the iconic square pan pie at home. With a high‑hydration dough and simple stretch‑and‑folds, you build a light, airy crumb without heavy kneading.
Prep is the secret: butter the 9×13 metal pan, add olive oil, and press shredded cheese to the edges so a crispy frico rim forms as it bakes.
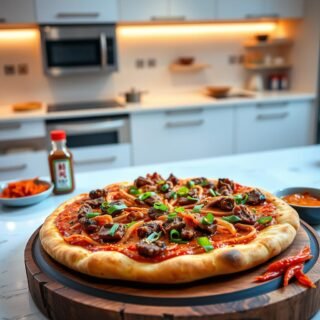
Set the pan on the bottom rack at 450°F, bake about 15 minutes, then add thick, strained sauce in stripes and finish 5–8 minutes until bubbly and golden. Finish with basil‑garlic oil and move the pie to a cooling rack so the base stays crisp.
This method gives you bold sauce stripes, chewy interior, and lacey cheese edges, plus a straightforward time plan that fits weeknight dinner. Pair with a classic Caesar salad and you’ve got a highly recommendable, delicious pizza to share at home.
Key Takeaways
- High‑hydration dough and stretch‑and‑folds yield a tender, airy crumb.
- Butter + olive oil in a 9×13 metal pan ensures easy release and crisp edges.
- Press cheese to the perimeter to create the signature frico rim.
- Bake bottom‑rack at 450°F, add sauce mid‑bake, then finish until golden.
- Cool on a rack to keep the bottom crisp and serve with a simple salad.
Why You’ll Love This Detroit-Style Pizza Right Now
The red-top method locks tangy sauce on the surface so each slice hits with vivid flavor and a crunchy bottom.
This approach gives you a lofty, focaccia-like crumb and a caramelized cheese halo. Pushing cheese to the edges forms a frico crust that crackles when you bite. The mid-bake stripe of red sauce keeps the base dry while delivering bold top notes.
You get repeatable results in less time, which makes weeknight dinner feel special without stress. The process fits your schedule and the bake time is reliable.
The red-top trend and why it’s the #1 dinner move
- You jump on the red-top trend for a direct taste hit while preserving a crisp base.
- You make sure your meal feels elevated with minimal fuss and consistent time to finish.
- You’ll highly recommend this to friends who want big flavor and easy execution.
Thick-and-fluffy crumb, crispy cheese edge, bold sauce stripes
The dough stays airy under generous toppings, so the interior is soft but not soggy. Cheese at the edge caramelizes into a crunchy halo that adds texture contrast.
Stripes of red sauce add tang without soaking the crust. This way of building the pie makes it easy to customize toppings while keeping the core format for consistent results every time.
What Makes Detroit-Style Different from Other Pies
You’ll notice the difference from the first bite: a pillowy interior, a crisp, cheesy edge, and sauce on top. This method uses metal pans—originally repurposed automotive trays—to deliver strong heat transfer. That hot metal helps the bottom set while the top blisters.
Frico edges form when cubed cheese is pressed to the walls. As the cheese melts against the pan, it caramelizes into a lacy rim that adds crunch and deep savory flavor. That caramelized cheese gives you richer taste than toppings alone.

You add red sauce on top rather than under the toppings. This red sauce-on-top approach protects the focaccia-like dough from moisture so the base stays crisp. The result is a thick, rectangular pie that makes the corners extra crunchy and keeps generous toppings from sogging the crust.
- You get edge-to-edge cheese and a unique pan pizza identity.
- The focaccia-style dough puffs into a soft, airy crumb that holds toppings well.
- The Motor City origin and metal-pan bake combine into a format that many call one of the best pizza types for texture contrast and bold taste.
Detroit Style Pizza Recipe: Square Pan Pizza (2025 Hottest Style!) ⭐ #1 TREND
Begin by greasing a nonstick 9×13 pan with butter, then coat it lightly with oil so the crust browns and releases cleanly.
Mix a high‑hydration dough and perform stretch‑and‑folds every 30 minutes for three to four rounds over about two hours. This builds structure without heavy kneading and saves you active mixing time.
After folds, transfer to the oiled pan and pan‑proof for 1.5–2 hours until puffy. Use cubed cheese and press pieces to the walls so the molten edges form a crisp frico rim during baking.
Bake at 450°F on the bottom rack for roughly 15 minutes. Add thick, strained sauce in stripes, then bake another 5–8 minutes until the top is bubbly and the edges caramelize.
- Stepwise recipe: easy, repeatable, and pro‑level texture.
- Precise time cues: mixing, folds, proofing, and bake windows keep results consistent.
- Finish: drizzle basil‑garlic oil and move the pie to a cooling rack so the bottom stays crisp.
This way balances food-focused technique with a clear path you’ll highly recommend to friends who want great cheese and reliable results.
Ingredients You Need for the Base, Sauce, and Toppings
Start by laying out precise amounts of flour, water, yeast, and oil to avoid guesswork.
Dough essentials
For one pan, weigh 300 g all‑purpose flour, 250 g water, 4 g instant yeast, 7 g kosher salt, and 18 g extra‑virgin olive oil. You’ll measure by weight to hit the right hydration and spring.
Cheese strategy
Use about 2 cups cubed cheese. Wisconsin Brick is ideal for that caramelized edge. If Brick isn’t in the store, mix low‑moisture mozzarella with Emmental or Cheddar for flavor and stretch.

Sauce and toppings
Strain roughly 1½ cups of pizza or marinara tomato sauce in a fine sieve for 15 minutes. This removes excess liquid so sauce sits on top without soaking the crumb.
Plan for about 1 cup pepperoni; choose pepperoni cups when possible for crispy rims. Keep butter and a little oil on hand to grease the pan for clean release.
| Component | Amount | Notes | Why it matters |
|---|---|---|---|
| Flour | 300 g | All‑purpose | Controls structure and crumb |
| Water | 250 g | Room temp | Sets hydration and rise |
| Cheese | 2 cups (cubed) | Brick or moz/blend | Forms frico edge and even melt |
| Sauce | 1½ cups strained | Fine mesh, 15 min | Prevents soggy base |
- Make sure you measure weights when possible; it keeps the flour recipe consistent.
- Consider hot honey for finishing if you like sweet‑heat on savory food.
- Buy quality items at the grocery so your food tastes big without extra effort.
Essential Tools and Pan Prep for a Legit Square Pan Pizza
Every great pan pizza starts with the right metal pan and a simple grease routine that guarantees release and browning.
Use a nonstick 9×13‑inch metal pan to mimic classic bake conditions at home. Butter the bottom first, then pour a thin coat of olive oil so dough lifts cleanly and the base crisps without sticking.
Weigh ingredients on a kitchen scale to hit hydration targets. A Danish whisk or sturdy spoon brings shaggy dough together fast with minimal mess.
Quick toolkit and workflow
- Pan: nonstick 9×13 metal for even heat transfer.
- Fat: butter then oil to ensure clean release and golden bottom.
- Tools: kitchen scale, Danish whisk, thin metal spatula, and a butter knife for final release.
- Bake: preheat fully and place the pan on the bottom rack at 450°F for strong bottom browning.
- Cheese: push cubes to the walls so contact with the hot metal creates a lacy frico edge.
“A simple kit—good pan, scale, and careful greasing—removes guesswork and makes every bake reliable.”
| Item | Why it matters | Tip |
|---|---|---|
| Nonstick 9×13 metal pan | Matches traditional heat and shape | Butter then oil for best release |
| Kitchen scale | Controls hydration and dough handling | Weigh flour and water for repeatability |
| Danish whisk / sturdy spoon | Mixes high‑hydration dough cleanly | Use short bursts to combine ingredients |
| Bottom rack placement | Drives heat into the base for browning | Preheat oven fully to 450°F before baking |
You’ll highly recommend this simple toolkit because it reduces errors and keeps the focus on toppings and flavor. With these steps, your baking routine yields consistent food that looks and tastes professional.
Master the Dough: Mix, Rest, and Stretch-and-Fold
Start by combining flour, instant yeast, salt, lukewarm water, and olive oil until a shaggy, wet dough forms. Let it rest for 30 minutes so the flour hydrates and gluten begins to develop on its own.
High-hydration mixing and 30-minute cadence
Use a timer for consistency. After the first rest, perform a stretch-and-fold from one side around the bowl, then repeat every 30 minutes.
Three to four rounds for structure without kneading
Do 3–4 rounds over about two hours. Work from one side at a time so each fold builds strength without heavy handling.
- Mix a shaggy, wet dough and resist adding extra flour; hydration gives spring.
- Follow a strict time cadence and scrape bowl sides between folds to keep all dough active.
- Expect a smoother, elastic mass that traps gas for better baking and cheese melt later.
- This gentle method mirrors focaccia recipes and fits your schedule like a short tea break.
| Step | Action | Why it matters |
|---|---|---|
| Mix | Combine flour, yeast, salt, water, oil | Forms shaggy base for gluten to develop |
| Rest | 30 minutes | Hydrates flour and relaxes dough |
| Folds | 3–4 rounds, one side at a time | Builds strength without kneading |
| Check | Smoother, elastic feel | Holds gas for airy crumb and better food texture |
Pan Proof and Corner Stretch for That Even, Airy Base
Grease the pan well, then transfer the dough using a gentle letter‑fold so pockets remain intact as you shape.
Flip the dough seam‑side down after the transfer. This keeps the seams tucked and the top smooth. Grease the pan with butter, then a light coat of olive oil so the dough releases and browns cleanly.
Proof in a warm spot for 1.5–2 hours. This is the key time when the dough relaxes and spreads evenly to the edges. While it proofs, preheat your oven to 450°F so heat is ready when the dough is.
How to shape without losing lift
- Letter‑fold as you transfer to maintain strength and gas pockets.
- Oil your hands and gently press the dough to all four corners for uniform thickness.
- Avoid popping every bubble; preserve lift so the interior stays airy.
- Shape quickly but lightly, then place cheese right after shaping so the dough doesn’t retract.
- These steps build a platform that bakes airy inside and crisp outside for a great pan pizza.
You’ll highly recommend this gentle approach for consistent corner‑to‑corner coverage. Keep movements light and respectful of the dough’s structure so your food bakes with a tender crumb and a crisp edge.
Cheese-to-the-Edges: Build the Signature Crispy Rim
Start by cubing low‑moisture cheese into small, even pieces so each melt behaves predictably.
Cut cheese into uniform cubes about 1/2 inch. This helps the cheese melt steadily and prevents pools that can sog the base. Press cubes wall‑to‑wall, overlapping slightly so the molten edges meet the hot metal.
Make sure there are no gaps along the perimeter. Gaps break the frico ring and leave uneven browning. Add a few extra cubes at each corner to maximize the golden crunch where the crust meets the tin.

Cubing, overlap, and why it works
Small cubes caramelize differently than shreds. Cubes hold shape as they melt and form a lacy, dark rim that becomes a crispy crust hallmark of this style pizza.
- You cube cheese so it melts evenly and settles into corners without pooling.
- You overlap pieces against the pan walls to guarantee a dark, lacy frico ring.
- You distribute cheese generously to protect the crumb during the first bake.
- You keep tomato sauce off for now so top heat hits cheese directly.
| Action | Why it matters | Quick tip |
|---|---|---|
| Cube cheese | Even melt and predictable caramelization | 1/2″ cubes work well |
| Overlap at edges | Creates continuous frico rim | Press cubes against pan wall |
| Add corner cubes | Maximizes crunch at high‑contact points | Extra 2–3 cubes per corner |
| Hold sauce for later | Keeps rim shatter‑crisp | Stripe tomato sauce after first bake |
Load the Pepperoni, Then First Bake on the Bottom Rack
Once the cheese is set, arrange your pepperoni across the surface. Use pepperoni cups when possible for crisp, cupped edges that trap savory oil. This adds rich flavor as fats render into the top layer of the food.
Timing at 450°F and signs your crust is setting
Slide the pan onto the bottom rack at 450°F and bake for about 15 minutes. Watch for bubbling cheese and puffed edges — those visual cues tell you the crust is beginning to set.
Make sure the bottom shows a light brown before you pull the pie. If your oven has hot spots, rotate the pan halfway through to get even color.
- Layer pepperoni over the cheese so fat renders into the top for depth of flavor.
- Prefer pepperoni cups if available for crisp rims and small oil pools.
- Keep an eye on time, but trust the visuals: bubbling cheese, sizzling corners, and lightly set edges.
- Avoid overloading the surface — balance toppings so the structure holds for the next bake.
After this first bake, remove the pan and add sauce stripes. That step keeps the crust crisp and primes the pie for the final baking phase.
Red-Top Sauce Strategy: Stripes and Dollops to Keep It Crisp
Pull the pie after about 15 minutes when edges are set and cheese is bubbling lightly. This pause is the critical moment to add sauce without risking a soggy base.

Spoon 1½ cups of thickened marinara into parallel stripes or measured dollops across the top. Leave most of the cheese and pepperoni exposed so those edges can still brown and blister.
When to add sauce and how much to avoid sogginess
Return the pan to the oven for a short finish — about 5–8 minutes — until the cheese blisters and the corners turn deep golden. You’ll hear a lively sizzle at the rim when the frico is dialed in.
- Timing: add red sauce mid-bake so the base stays crisp and sturdy.
- Amount: about 1½ cups — enough to taste tomato brightness without flooding the top.
- Texture: make sure the tomato sauce has been strained thick; thin sauce invites sogginess.
- Keep pepperoni edges exposed so they continue to crisp while the top finishes.
- Pull when cheese blisters and corners look mahogany to lock in contrast: airy crumb, crisp base, bold top notes.
| Action | Measure | Why it matters |
|---|---|---|
| Add sauce mid-bake | After ~15 minutes | Keeps base dry and crisp |
| Spoon pattern | 1½ cups in stripes/dollops | Controls moisture and preserves browning |
| Finish bake | 5–8 minutes | Blisters cheese, deepens edge color |
| Sauce prep | Strained thick | Prevents soggy crumb |
Finish Like a Pro: Basil-Garlic Oil, Release, and Cooling Rack
Drizzle, lift, and rest so the bottom stays shatter-crisp.
Whip a quick basil‑garlic oil by blending a handful of basil leaves with 1–2 smashed garlic cloves, a pinch of salt and pepper, and a generous pour of olive oil. Strain or leave it slightly textured for more aroma.
Run a thin butter knife or metal spatula around the frico rim to free the edges, then slide the pie out gently. Lift the pie onto a cooling rack so steam escapes and the bottom keeps a crispy crust.
Before you slice, drizzle the basil oil sparingly over the top to add sheen and bright notes that play with the melted cheese. Serve right away so textures are peak and the aroma is vivid.
- You process basil, garlic, and olive oil for a bright, finishing touch.
- You free the frico rim carefully to keep the lacy edge intact.
- You move the pie to a rack so the bottom stays crisp instead of steaming soft.
- You slice and serve while the cheese is bubbling and the kitchen smells like a pizzeria.
“This final step preserves contrast—lacy rim, bubbly top, and a shatter‑crisp base.”
You’ll highly recommend this finish because it makes good food taste exceptional and highlights the care in every bite.
Topping Ideas, Variations, and Hot Honey Finishes
A small ribbon of hot honey adds instant sweetness that plays well with savory cheese and pepperoni. Use finishing accents to balance salty, fatty, and bright notes without masking the crust and melt.
Mix-and-match cheeses and crisp veggie swaps let you tailor texture and taste. Try Wisconsin Brick if you can. If not, blend low‑moisture mozzarella with Emmental or sharp Cheddar for character and stretch.
Mozzarella-Emmental, cheddar blends, and veggie swaps
Combine mozzarella‑Emmental for creamy stretch and a nutty edge. A touch of Cheddar gives punch and color.
Lean on pepperoni cups for cupped, crispy rims that hold flavorful oil. For veggies, pick peppers, thin onions, or mushrooms that stay texturally pleasing when the sauce is applied mid-bake.
Hot honey drizzle, parmesan shower, and chili flake heat
Finish lightly: a zig‑zag of hot honey is the key accent that balances salt and umami. Add a fine grate of parmesan and a scatter of chili flakes for warmth without weighing down the top.
Keep your sauce thick so toppings don’t steam. Try basil‑garlic oil plus honey for an herby‑sweet layer. Test one new combo per bake so you dial in your favorite — you would recommend this method to friends seeking bold, focused food and excellent taste.
Make-Ahead, Storage, and Reheating Without Losing the Crunch
Plan to chill the proofed dough overnight so you can bake a fresh pie with minimal morning effort. After pan proof, cover the tray tightly and place it in the fridge. The slow cold ferment improves flavor and gives you flexible bake time the next day.
When you’re ready to finish: bring the dough to room temp, then gently stretch it to the corners to avoid tearing. This small step saves time and preserves lift.
Store and reheat tips for leftovers
Keep leftover pizza slices in an airtight container in the fridge for up to two days. Avoid the microwave — it softens the base and dulls the edge.
- Skillet: reheat slices over low–medium heat with a lid for a minute, then remove lid to crisp the bottom.
- Oven: preheat to 425°F and reheat on a preheated sheet or rack for 8–12 minutes to restore the rim.
- Freeze: wrap cooled pizza slices tightly and store up to one month. Thaw in the fridge, then reheat at 425°F for 10–12 minutes.
| Task | Method | Why it matters |
|---|---|---|
| Make-ahead | Refrigerate pan‑proofed dough overnight | Better flavor and flexible bake time |
| Short-term storage | Airtight in fridge (≤2 days) | Keeps food safe and texture stable |
| Reheat | Skillet or 425°F oven | Restores crisp base and hot cheese |
| Freezing | Wrap tightly, freeze ≤1 month | Convenient stash that re-crisps on reheat |
“Make sure to place slices on a preheated rack or sheet so the bottom re-crisps; these tactics are key to eating great leftovers.”
What to Serve with Detroit-Style: Simple Sides and Drinks
Round out the meal with a crisp green and a chilled drink to balance the rich, cheesy slices. A smart pairing keeps textures and flavors clear so each bite stays exciting.
Classic Caesar salad pairing and weeknight beverage ideas
Pair your pie with a classic Caesar salad to refresh your palate between cheesy bites. Keep the dressing light and use torn romaine, a quick parm shave, and a few lemon wedges.
Keep dinner simple: add a cold drink and a green so the meal feels balanced and easy to serve on a weeknight. Sparkling water with lemon, a light beer, or an easy‑drinking red all work well.
- You pair the pie with a Caesar salad to cut richness and add crunch.
- You garnish the salad lightly so the pie remains the star.
- You plan portions so guests enjoy a slice or two plus salad without feeling weighed down.
- You offer chili flakes and grated parmesan at the table for customizable heat and umami.
- You keep dessert light—sorbet or fresh fruit—to finish on a bright note.
- You would recommend this simple formula for stress‑free hosting.
| Side | Why it works | Serving tip |
|---|---|---|
| Classic Caesar salad | Creamy acid cuts fat and refreshes the palate | Light dressing, fresh romaine, lemon on the side |
| Sparkling water with lemon | Clears the mouth between bites | Serve chilled with ice and a citrus wedge |
| Light beer / easy red | Complements richness without overpowering | Offer both so guests choose |
Where Detroit-Style Shines on the Scene
You’ll find this format at counters and tables where chefs push cheese to the edge and let metal meet heat for dramatic browning.
From Motor City roots to NYC standouts like Emily
The story begins in the 1940s at Buddy’s Rendezvous, where heavy steel trays—originally automotive parts—helped form a caramelized, lacy rim that became iconic.
Today the method travels well. In New York, the popular spot Emily turned the square pie into an urban staple. Their MVP, with pesto, red sauce, and vodka sauce layers, is a clear must try for sauce lovers.
Why it matters: this approach adds crunch and chew you won’t get from round loaves. Cities known for classic slices now praise this take for a fresh textural contrast and bold top flavors.
| Origin | Modern Spot | Food signals |
|---|---|---|
| Buddy’s Rendezvous, 1940s | Emily (NYC) | Caramelized edges, airy crumb |
| Heavy steel trays | MVP with layered sauces | Balanced toppings, crisp-on-soft |
| Pan contact & cheese-to-edge | City kitchens adapting format | Frico rim, bold sauce notes |
You should add this to your must try list alongside regional classics. When you judge the best pizza, look for caramelized edges, airy crumb, and confident toppings—those are the signs of good food and pizza made with care.
Print, Save, and Share Your Best Pizza Night Yet
Create a simple card that records your exact weights, timings, and tweaks. This little sheet becomes the key to repeating a great bake.
Write down core data: flour 300 g; water 250 g; salt 7 g; instant yeast 4 g; olive oil 18 g. Note the bake schedule: bottom rack at 450°F for ~15 minutes, add thick strained sauce, then finish 5–8 minutes.
- Print or save a recipe card so your weights, bake times, and rack placement are always on hand.
- Jot pan prep—butter then oil—so release stays effortless.
- Save notes on sauce straining and cheese‑to‑edge placement; sauce thickness is a key to a crisp top.
- Share photos and results right away with friends who love bold, crispy‑edged pies.
- Track topping combos that worked best so you can repeat one best version next time.
Store this card at home and refine it after each bake. You’ll highly recommend the habit once you see consistent edges, crumb, and taste.
“A short, well‑kept card turns trial and error into repeatable success.”
Conclusion
Finish strong: use the bake timing, cheese-to-edge placement, and a basil‑garlic drizzle to lock in texture and aroma. These cues let you reproduce a thick, airy crumb and a caramelized cheese rim that makes each bite sing.
You now own an approachable method for a crispy‑rimmed, airy‑crumb detroit style pizza at home. Combine buttered pan prep, cheese‑to‑edge placement, and a two‑stage bake for repeatable success.
Keep sauce thick and on top so the base stays crisp and every slice pops with taste. Finish with basil‑garlic oil for aroma and sheen that turns good food into a delicious pizza.
Save the core recipe and your notes. You’re ready to slice, share, and bake the one best pie for friends and family.
FAQ
What pan should you use to get the classic crispy, cheesy rim?
Use a sturdy nonstick metal 9×13 or a purpose-built rectangular steel pan. Coat it with a mix of butter and neutral oil so the dough releases and the cheese fries against the edges, creating that shatter-crisp crust.
How hydrated should your dough be for a light, airy crumb?
Aim for a high-hydration dough around 65–70% (water by weight). That gives an open, focaccia-like texture while still holding up to toppings when you do quick stretch-and-folds instead of heavy kneading.
When do you add the sauce so the base stays crunchy?
Add red sauce in stripes or dollops after the first bake when the crust has set but before the final broil. That keeps moisture out of the dough and lets the sauce stay bright without making the bottom soggy.
What cheese should you use to get the frico edge and melty interior?
Brick cheese is ideal for authentic frico edges, but a blend of low-moisture mozzarella with a touch of cheddar or provolone works great if brick isn’t available. Cube or grate and press cheese right to the pan walls for that crispy lace.
How long and where do you bake for the best results?
Preheat to 450°F and bake first on the bottom rack until the crust sets and cheese begins to brown, about 12–18 minutes depending on oven. Finish under high heat or broil briefly to crisp the top edges.
Can you make the dough ahead of time?
Yes. Refrigerate proofed dough overnight to deepen flavor and make same-day shaping easier. Bring it back to room temp before final pan proof to help it spread and rise evenly.
How do you reheat slices without losing the crunch?
Reheat on a cast-iron skillet over medium-low heat for a few minutes, then cover briefly to warm through. Alternatively, pop slices in a 400°F oven on a lower rack for 5–7 minutes to revive the crisp base.
What are quick topping ideas that won’t weigh the crust down?
Keep toppings light and evenly distributed: thin pepperoni, a scatter of basil, olives, roasted peppers, or a sprinkle of parmesan. Finish with a drizzle of hot honey or basil-garlic oil for brightness.
How do you avoid greasy, soggy edges when using pepperoni?
Use quality, thin-cup pepperoni and place it directly on top of the cheese so the fat renders into the frico edge, not into the dough. Blot excess oils before serving if needed and bake long enough for the crust to set.
What tools help you nail pan prep and timing?
A kitchen scale ensures consistent dough, a Danish whisk helps mixing, and a thermometer verifies your oven. Place the pan on the bottom rack for initial bake to get a strong, crisp base.
Can you freeze leftovers and how do you reheat from frozen?
Yes. Freeze cooled slices on a tray, then bag them. Reheat frozen slices in a 425°F oven on a preheated skillet or baking sheet for 10–12 minutes to restore crunch without sogginess.
What simple sides pair best for a weeknight dinner?
A crisp Caesar salad, quick slaw, or roasted vegetables balance the richness. Keep drinks simple: iced tea, lager, or a citrusy spritz complement the savory, cheesy slices.