You’ll master a reproducible, high-performance pizza workflow that yields a crisp, chewy crust and balanced toppings. Use calibrated ratios, controlled fermentation, and high-heat baking on a stone or steel. I’ll provide concise steps, timings, and one simple technique that transforms texture.
Why Make Pizza at Home?
Because you control ingredients, temperature, and timing, making pizza at home lets you reliably produce superior crust structure, balanced toppings, and predictable bake results. You calibrate oven heat, dough hydration, and resting intervals to achieve target crumb openess, crispness, and blister distribution. You set topping layering and mass distribution to avoid sogginess and guarantee even thermal penetration. You iterate recipes, measure variables, and document bake cycles to establish reproducible outcomes. You reduce cost per pie while increasing nutritional and flavor precision through portion control and substitution choices. You refine technique—stretching, docking, par-baking—to match equipment constraints. You troubleshoot faults systematically, adjusting one parameter at a time. Home production converts guesswork into controlled experiments that yield consistent, high-quality pizzas. You’ll gain predictable results and scalable throughput.
Essential Ingredients You’ll Need

You’ll need strong bread flour and active yeast to build dough structure and control fermentation. Precisely measured water and salt regulate hydration, gluten development, and flavor. Finish with curated toppings and high-quality cheeses chosen for moisture content and melt characteristics to achieve the desired texture and taste.
Flour and Yeast
Flour provides the gluten matrix and yeast supplies the gas that leavens the dough; selecting the proper types and proportions controls strength, extensibility, water absorption, and fermentation kinetics. You’ll select flour by protein percentage, aiming for specific gluten strength for your style. Choose higher protein for chew and structure, moderate for balance, lower for extensibility. Use fresh flour and record batch properties. Select instant or active dry yeast based on schedule; instant tolerates direct mixing, active dry benefits from rehydration. Set yeast as a baker percentage tied to temperature and fermentation time. Always weigh yeast. Confirm viability with a short proof test. Keep formulations consistent to predict dough rheology, gas production, and final crust texture and flavor. Adjust yeast downward for long cold ferments.
Water and Salt
While water hydrates the flour and creates the continuous phase for gluten development and enzymatic activity, salt plays a precise biochemical and functional role you’ll need to control. You measure water by baker’s percentage relative to flour; hydration between 55–70% alters dough extensibility, gas retention, and oven spring. Use cool water to slow fermentation or warmer water to accelerate it, adjusting for ambient temperature. Salt at 1.8–2.2% of flour weight strengthens gluten through ionic interactions, tightens the protein matrix, and regulates yeast osmotic activity, reducing overproofing. Dissolve salt in the dough liquor or add after initial mixing to avoid direct contact with yeast. Accurately weigh both ingredients with a calibrated scale for reproducible texture and flavor. Record weights and temperatures daily for consistent results.
Toppings and Cheese
After controlling dough hydration and ionic balance, choose toppings and cheese that respect the dough’s thermal and moisture budget. You’ll prioritize low-moisture, high-melting-point cheeses (aged mozzarella, provolone) for stable melt and minimal runoff. Use fresh mozzarella sparingly; press and dry-salt it to lower free water. For toppings, pre-cook high-moisture vegetables and drain rendered liquids; slice meats thinly to equilibrate thermal mass. Distribute toppings to avoid localized heat sinks that hinder crust rise. Weigh portions: typical cheese coverage is 80–120 g per 30 cm pie depending on desired browning. Apply oil or semidry sauces to buffer moisture transfer when using wet ingredients. Finish with volatile aromatics (basil, cured prosciutto) post-bake to preserve flavor and texture contrast. Adjust quantities based on oven temperature and bake duration.
Easy No-Fuss Pizza Dough Recipe

You’ll use a quick-rise dough method that reduces proofing to about 30–45 minutes while maintaining crumb structure. You’ll get a simple ingredients list — flour, instant yeast, water, salt, and olive oil — with precise ratios for reproducible results. Follow the easy kneading tips: a 5–7 minute hand knead or a 3-minute mixer cycle to develop gluten without overworking.
Quick Rise Dough
Using instant yeast and 60–65% hydration, you can develop a workable pizza dough in 45–60 minutes by combining strong bread flour, salt, water at 100–110°F (38–43°C), and a small amount of oil, then mixing briefly and performing a short knead followed by a 20–30 minute bench rest and one quick fold; this protocol optimizes gluten development while preserving extensibility for thin, uniform crusts. You’ll measure hydration precisely, weigh ingredients, and control temperature to guarantee predictable fermentation and rheology. Mix until the mass coalesces, then knead with moderate intensity for three to five minutes to align gluten strands. Rest on the bench to relax the network, perform a single stretch-and-fold, then divide and shape immediately. Bake on a preheated surface to capture oven spring effectively.
Simple Ingredients List
A handful of pantry staples is all you need for an easy, no-fuss pizza dough: strong (high-protein) bread flour, water measured to 60–65% hydration, a small pinch of instant yeast, 1.8–2.2% salt by flour weight, and a tablespoon or two of neutral oil if you want added extensibility and browning.
You’ll measure ingredients by weight for consistency. Use bread flour (12–13% protein) for structure; adjust water to achieve the target hydration ratio; keep yeast minimal for predictable fermentation; weigh salt precisely to control osmotic effects. Oil is optional but will affect extensibility and crust color. Achieve reproducible results by calibrating your scale and using room-temperature water.
- Bread flour (by weight)
- Water at 60–65% hydration
- Instant yeast, salt, optional neutral oil
Expect consistent professional results.
Easy Kneading Tips
Developing gluten through controlled folding and timed passes gives you a strong, extensible dough without overworking it. You’ll use tactile cues: smooth surface, slight resistance, audible windowpane. Work in 3-minute cycles: fold, rest, rotate. Use a lightly floured bench and keep hydration consistent; too much flour masks development. Monitor temperature: dough should warm to ~24°C (75°F) after kneading. Perform 4–6 passes depending on strength; each pass should be deliberate, not frantic. Test extensibility with the windowpane method; if it tears, continue resting rather than aggressive kneading. Below is a concise technique map.
| Step | Action | Cue |
|---|---|---|
| 1 | Fold 3 min | Smooth |
| 2 | Rest 10 min | Relaxed |
| 3 | Test | Windowpane |
Follow these steps and measure results precisely.
Quick and Flavorful Tomato Sauce
Simmering peeled tomatoes briefly concentrates flavor while preserving bright acidity. You’ll blend peeled plum tomatoes, drain excess liquid, and reduce for 8–10 minutes to achieve a glossy, spoonable viscosity. Season methodically: measured salt, a pinch of sugar to balance acidity, and calibrated crushed red pepper if you want heat. Finish with cold extra-virgin olive oil to emulsify and lift aroma. Use a high-speed blender for a uniform texture; avoid overworking for rustic micro-chunks.
- Use canned San Marzano or equally dense plum tomatoes.
- Measure 1 tsp salt per 400 g tomatoes; adjust after reduction.
- Add 1 tbsp olive oil off heat to preserve volatile aromatics.
You’ll store cooled sauce refrigerated up to 5 days or freeze in portioned containers for consistent usage.
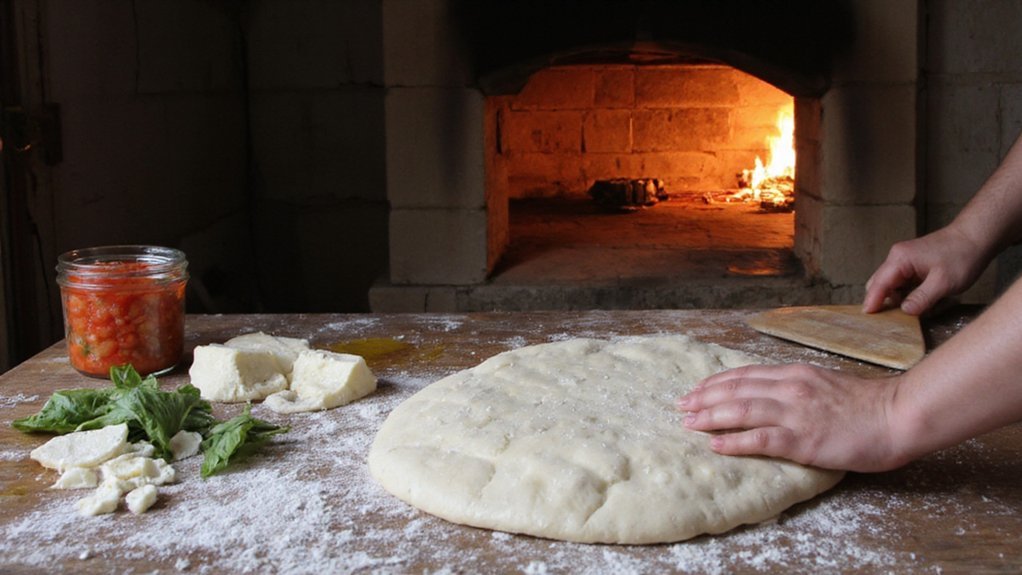
Stretching and Shaping the Dough
You should bring the dough to room temperature so gluten relaxes and the mass becomes extensible. Use gentle fingertip pressing and gravity-assisted stretching to expand the center without tearing, and don’t tug at weak spots—rotate frequently to maintain even thickness. For a defined edge crust, pinch and roll the outer rim to concentrate dough and create surface tension that yields oven spring.
Room Temperature Dough
Allowing the dough to relax at room temperature for 30–60 minutes will restore gluten extensibility and make shaping predictable. You should keep the dough covered to prevent skin formation; a lightly oiled bowl with plastic wrap or a damp cloth works. Aim for ambient temperature between 68–75°F (20–24°C); cooler rooms need longer rest. Test readiness by pressing with two fingers—indentation should slowly rebound.
- Verify surface is lightly floured, not saturated.
- Use a consistent bench height and minimal force when stretching.
- Rotate the dough frequently to maintain uniform thickness.
After resting, you’ll find the dough pliable and responsive; proceed with measured stretching and shaping for consistent crust structure and controlled oven spring. Avoid sudden temperature shifts and resume shaping within fifteen minutes to preserve extensibility immediately.
Handling Without Tearing
Firmly supporting the dough with gentle fingertips avoids thin spots and tears and gives you precise control over thickness and edge formation. You’ll press center-to-edge with consistent, radial motions, keeping pressure light near the perimeter to preserve the rim. Rotate the dough frequently to distribute weight evenly; gravity will aid expansion if you support the middle with cupped hands and let the rim hang slightly. Keep the dough well-floured but not overloaded; excess flour causes tearing when it dries. If a thin spot appears, seal it immediately by pressing surrounding dough inward and smoothing with fingertips. Rest the dough five to ten minutes under a damp cloth if it resists stretching; this relaxes gluten and reduces snapping. Work deliberately; rushed handling causes tears, always.
Edge Crust Formation
Once the center is even and tear-free, set the rim by stretching from center to edge with controlled pulls and short rotations, creating a consistent band of thicker dough about 1–1.5 cm high and 1–2 cm wide. You’ll maintain a defined lip by pinching excess at intervals, not continuously, which preserves gas pockets for oven spring. Use your knuckles to support the underside while you shape the outer band; avoid pressing the center. Check thickness with a quick visual sweep and fingertip feel to confirm uniformity. Final adjustments must be minimal to retain tension.
- Pinch at 2–3 cm intervals to seal and define.
- Rotate on the back of your knuckles for gravity-assisted stretching.
- Keep center pressure below 1 kg to prevent degassing and structure.
Best Toppings and Flavor Combinations
Anyone building custom pizzas must balance flavor intensity, moisture, and cook-time compatibility to avoid soggy crusts or uneven doneness. You should prioritize ingredients by water content and melting point: high-moisture vegetables (tomato, zucchini) need pre-roasting or thin slicing; cured meats (pepperoni, prosciutto) render fat and concentrate salt; fresh mozzarella releases moisture and benefits from partial draining. Pairings should contrast: astringent greens (arugula) cut fatty cheeses; acidic components (pickled peppers, vinegars) brighten rich toppings. Limit heavy proteins per pie to maintain heat transfer and uniform baking. Apply herbs and delicate greens post-bake to preserve aroma. Measure toppings by weight per square inch to replicate results and adjust for oven variability. Document quantities and placement patterns; you’ll fine-tune crispness, flavor balance, and yield with controlled repetition.
How to Preheat and Use a Pizza Stone or Steel
Because topping moisture and load change how heat reaches the dough, you must control the slab temperature and heat-transfer path when using a stone or steel. Preheat slab in the middle or lower oven position for 45 to 60 minutes at target temperature; steel needs less mass time (30 to 45 minutes).
- Verify surface temperature with an oven thermometer or infrared gun.
- Use a well-floured peel and semolina or rice flour to prevent sticking.
- Transfer and retrieve pizzas quickly to minimize oven heat loss.
After baking, don’t hit hot slab with cold water or rapid shocks; cool gradually inside oven. Clean by scraping cooled residue and wiping with a damp cloth; avoid soap on porous stones. Maintain safety with oven mitts and long tools.
Baking Techniques for Crispy, Chewy Crusts
If you want a crust that’s crisp on the outside and chewy inside, control four variables: heat flux to the dough, surface conductivity, dough hydration and fermentation, and bake timing. You’ll maximize heat flux by using very high oven temperatures (500–550°F/260–288°C) and preheated steel or stone, and by minimizing air gaps between dough and surface. Surface conductivity favors steel for rapid bottom browning; stone retains heat for sustained bake. Target dough hydration 60–65% for handling and chew; higher hydration increases oven spring but needs stronger gluten. Ferment longer at cooler temperatures to develop flavor and extensibility; use cold retardation if time allows. Final bake timing: prioritize rapid initial blast for crust rise, then short finish to set crumb without overbrowning. Monitor color and doneness.
Time-Saving Shortcuts and Make-Ahead Tips
When time’s tight, plan processes that shift labor away from bake time and preserve dough and components without sacrificing texture: cold-retard dough in the refrigerator for 24–72 hours to develop flavor and extensibility, or portion and freeze dough balls for up to 3 months (thaw in the fridge 24–48 hours before proofing); par-bake crusts 3–5 minutes on a preheated steel or stone to set the surface for quick finishing; store pizza sauce airtight in the refrigerator for up to 7 days or freeze in portioned containers for 2–3 months; assemble toppings in advance but keep high-moisture and delicate items (fresh basil, mozzarella pearls) off until right before baking to prevent sogginess; and preheat your baking surface at temperature for 45–60 minutes to guarantee repeatable bottom browning when you rehearse or finish pizzas rapidly.
Use batch workflow: shape multiple crusts, proof on oiled trays, and refrigerate on parchment to limit handling. Reheat frozen par-bakes at high heat for 6–8 minutes and finish immediately. Keep measured ingredient kits for each pizza to cut assembly time.
- Pre-portion cheeses, cured meats, and vegetables.
- Stage sauces in microwave-safe jars for rapid tempering.
- Thaw dough balls in the fridge on labeled trays.
Label and date refrigerated and frozen components to preserve rotation and quality.
Troubleshooting Common Pizza Problems
Should your pizza come out soggy, pale, or overly charred, diagnose by isolating heat, hydration, and handling variables: verify oven temperature with an infrared thermometer and confirm your stone or steel has preheated 45–60 minutes; assess dough hydration and proofing (overproofed or too-wet dough yields collapse and sogginess), check sauce and topping moisture (drain or par‑cook high‑water ingredients), and inspect bake rack position for uneven radiant/conductive heat—then adjust one parameter at a time (calibrate oven, lower hydration 2–4%, retarding dough, par‑bake crusts, move pizza closer to or farther from the broiler) to correct the specific defect. If crust is tough, reduce kneading or extend autolyse. If toppings slide, don’t over‑sauce. Log changes and test again, altering only one variable per bake for reproducible fixes.
Conclusion
You now have a reproducible, workflow-optimized pizza method: precise flour-to-water ratio, minimal yeast, controlled fermentation, and high-stone thermal mass to achieve blistered crust with tender crumb. You’ll shape gently to preserve gas, apply 120–150 g sauce and ~100 g low‑moisture mozzarella, and bake at 260–288°C (500–550°F) for 6–10 minutes. Follow timing and temperatures, and you’ll consistently produce a crisp, chewy, restaurant-quality pie at home. Adjust hydration, fermentation window, and oven setup to match your equipment.