You can make a thin, crisp, and chewy pie tonight using two clear paths: a speedy three-ingredient yogurt dough or a yeast-risen dough made with a 1:1 flour blend. Both methods are built to work in a home oven with tools you already own, like a pizza stone or baking steel and parchment.
This guide shows simple steps that remove guesswork. You’ll learn par-baking, rolling where you bake for easy transfer, and how to push oven heat to 450–550°F for blistered cheese and golden edges. No specialty gums beyond what’s in your blend are required.
Expect brand-aware tips for hydration so your dough behaves, plus when to reach for the yogurt version on weeknights and when to plan a yeast dough for a weekend project. By the end, you’ll have a repeatable method that yields restaurant-level results from first slice to last.
Key Takeaways
- You get two reliable dough paths: a fast yogurt base and a classic yeast dough.
- Par-baking and rolling on your stone prevent soggy bottoms.
- High heat (450–550°F) creates crisp crust and blistered toppings.
- Use a 1:1 blend (brands like King Arthur or Bob’s Red Mill) and adjust hydration.
- Simple ingredients and easy steps mean great flavor without fuss.
Why you’ll love this Best GF Homemade Pizza right now
You get two clear paths that both aim for a crisp base and real chew—fast or slow—so you can pick what fits your evening.
Thin, crispy, and chewy—just like your favorite slice
The yogurt method gives you a thin, crisp base in about 15 minutes before toppings. It’s ideal when you want a hot pizza in a hurry.
The yeast dough, made with Bob’s Red Mill Gluten Free 1-to-1 Baking Flour, needs a short rise. It delivers a thin, crispy, and chewy crust with more structure and bite.

From weeknight-easy to weekend project: choose your dough style
Par-baking is key for both paths. That extra step locks in a crisp crust so sauce and cheese stay on top instead of soaking in.
- You can go from nothing to a bake-ready base in minutes with the yogurt dough.
- Or take a little more time for a yeast dough that improves chew and stability.
- Both methods teach handling tricks that keep gluten-free dough manageable and consistent.
| Method | Prep time | Finish |
|---|---|---|
| Yogurt dough | ~15 minutes | Thin, very crisp base |
| Yeast dough (Bob’s Red Mill) | Brief rise (30–60 minutes) | Thin, crisp with chewy texture |
| Shared step | Par-bake (5–7 minutes) | Prevents soggy bottoms |
Ingredients and tools you need to make it tonight
With a short list of pantry items and a few key tools, you can mix either a three-ingredient yogurt dough or a yeast-based dough tonight.
Your dough, your way
Three-ingredient dough: 260 g thick Greek yogurt, 250 g gluten free self-raising flour, 1/4 tsp xanthan gum (optional). Add 1/2 tsp baking powder and 1/2 tsp salt if desired.
Yeast dough: warm water, active dry yeast, a touch of honey, Bob’s Red Mill Gluten Free 1-to-1 Baking Flour, 1 egg, salt, and extra-virgin olive oil for structure and flavor.
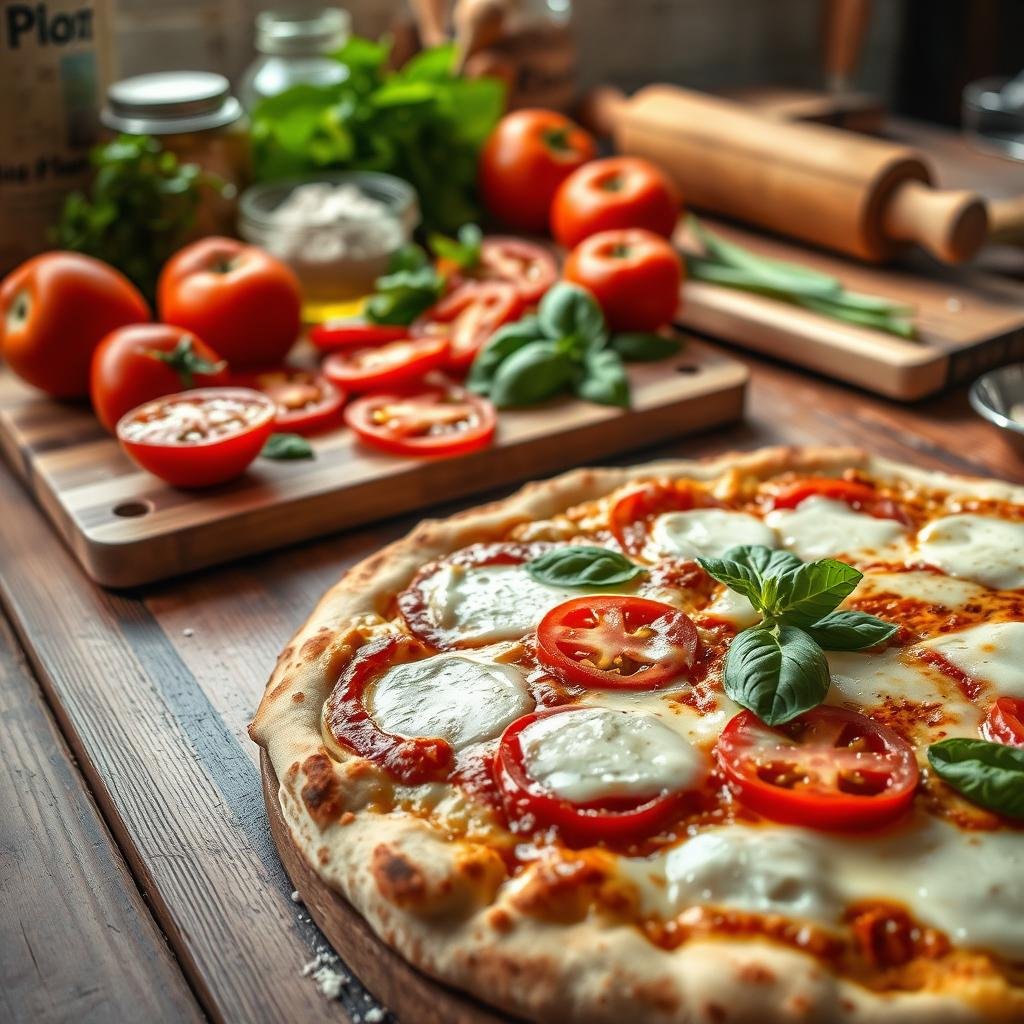
Simple sauce and fresh toppings
Make a quick marinara with olive oil, garlic, crushed tomatoes, salt, pepper, and basil. Or use a no-cook sauce with San Marzano tomatoes, garlic, oil, and salt for a bright finish.
Essential equipment
Use a baking steel or pizza stone, parchment, a pizza peel, a rolling pin, and a digital scale. Keep a large bowl for mixing and a tablespoon measure for oil and salt. Dust with rice flour to prevent sticking.

| Item | Yogurt dough | Yeast dough |
|---|---|---|
| Main ingredients | Greek yogurt, gluten free flour, xanthan gum | warm water, yeast, Bob’s Red Mill gluten free flour, egg, honey, olive oil |
| Sauce | quick marinara or no-cook San Marzano | same options |
| Tools | large bowl, rolling pin, digital scale, parchment, pizza stone | same plus pizza peel for transfer |
Gluten Free Pizza Recipe: Best GF Homemade Pizza
Follow two clear builds—one that saves time and one that rewards patience—so you can pick the crust style that fits tonight’s plans.
Option A: No-yeast yogurt dough for a fast, thin-and-crispy base
Mix 260 g thick Greek yogurt with 250 g self-raising gluten free flour and 1/4 tsp xanthan gum (optional). Knead lightly, split into two, and roll very thin. Dry-fry each round briefly to set the bottom and add color.
Top and finish in a 200°C fan / 450°F oven for about 8–10 minutes. This method gives a snappy crust in minutes and keeps things simple.
Option B: Yeast-risen dough with GF 1-to-1 flour for chew and structure
Proof yeast in warm water with a touch of honey for ~10 minutes. Mix in Bob’s Red Mill Gluten Free 1-to-1 flour, salt, egg, and a little olive oil.
Let rest about 1 hour. Roll to 1/4″ on your pizza stone or baking sheet, then par-bake 15 minutes at 450°F before adding sauce and cheese.
Shape and par-bake: roll on your stone/sheet for a sturdier crust
Roll where you bake to avoid messy transfers. Lightly brush with olive oil before par-baking to encourage color without greasiness.
Sauce, cheese, bake: finish hot for blistered cheese and golden edges
Spoon on sauce, add mozzarella and parmesan, then return to the hot oven for 12–15 minutes until the cheese blisters and edges turn golden.

| Method | Key steps | Time at a glance |
|---|---|---|
| No-yeast yogurt | Mix, roll thin, dry-fry, top, bake | ~15–20 minutes total; oven 450°F for 8–10 minutes |
| Yeast-risen 1:1 flour | Proof, mix, rest 1 hour, roll, par-bake, finish | ~90 minutes total; par-bake 15 min, finish 12–15 min |
| Shared tips | Roll on stone/sheet, brush olive oil, watch minutes closely | Par-bake prevents soggy crusts |
Pro tips to nail the crust every single time
A few targeted habits—accurate scales, hot steel, and smart par-bake—will fix most dough issues.
Measure by weight: why a scale matters
Always weigh your flour and water. Flours absorb water differently, so a scale gives consistent hydration and reliable texture.
King Arthur’s GF pizza flour runs about 121% hydration and behaves like a loose batter. Bob’s Red Mill 1-to-1 follows more standard yeast dough proportions.
Flour choices and handling high hydration
Pick blends made for baking instead of single flours so you get balanced starches and binders. Expect stickiness with higher hydration; dust the surface lightly with rice flour and work with gentle hands.
Use a light touch with a pin when rolling — roll directly on parchment to avoid tears and transfer issues.
Par-bake, roll where you bake, and heat strategy
Par-bake to seal the surface and prevent a soggy bottom. For King Arthur on a steel, a quick 2 minutes before topping helps; Bob’s 1-to-1 benefits from ~15 minutes par-bake.
Preheat a baking steel or pizza stone in the upper third of your oven at 450–550°F so the underside browns fast in minutes.
| Flour | Hydration behavior | Par-bake |
|---|---|---|
| King Arthur | High (≈121%) | 2 minutes on steel |
| Bob’s Red Mill 1-to-1 | Standard | 15 minutes |
| Tips | Dust with rice flour | Roll on parchment |
Easy variations and dietary swaps you can trust
You can turn the same dough into vegan, low-FODMAP, or classic versions with minimal fuss.
Dairy-free and low-FODMAP swaps
Swap in a dairy-free yogurt like Koko for the three-ingredient dough to make a vegan base. Choose a plant-based mozzarella that melts well so you keep texture and flavor.
If you follow a low-FODMAP path, use lactose-free yogurt and skip raw garlic in sauce. Instead, use garlic-infused olive oil for aroma without the FODMAPs.
Sauce and topping riffs
Go classic with a tomato-basil marinara, or use a silky no-cook San Marzano sauce for brightness. A garlic-and-herb oil works great as a white option under your cheese.
Brush the base lightly with olive oil before par-baking to encourage color and savory depth.
Thin vs thicker crust
Roll thinner for a cracker-like crisp. Roll a bit thicker and add a few extra minutes in the oven for a chewier pizza crust. Finish with fresh basil, a drizzle of olive oil, and a pinch of salt.

- Swap dairy-free yogurt and vegan cheese to keep the pie plant-based.
- Use lactose-free yogurt and garlic-infused oil for low-FODMAP options.
- Choose thin rolls for crisp edges or thicker rolls for chew and structure.
Make-ahead, freezing, and reheating without losing that crisp
Staggered prep—chill, par-bake, or freeze—lets you finish hot pies in minutes on busy nights. You can plan an hour of hands-on time and save the rest for later. Small steps now mean fast assembly and honest texture when you bake.
Chill the dough or par-baked bases for stress-free prep
For the yeast dough: let it rest about an hour, then chill in the bowl or portioned balls to slow fermentation and improve handling.
For the yogurt method: roll and par-bake rounds, then store in the fridge for 3–5 days. A quick 5 minutes at 200°C fan / 220°C (about 400–425°F) brings back crispness before toppings.
Freeze dough or crusts: portion, wrap, and thaw like a pro
Portion dough balls or stacked par-baked crusts, wrap tightly, and freeze up to 2–3 months. Thaw overnight in the fridge or for about 5 hours at room temperature if you thaw single portions.
Reheat the right way: oven or stone for crisp; skip the microwave
Reheat slices or bases on a preheated stone or steel in a hot oven to revive a crunchy underside. Skip the microwave — it makes the crust limp.
https://www.youtube.com/watch?v=box-OL1xuHk
| Item | Storage | Thaw / Reheat | Why it works |
|---|---|---|---|
| Yeast dough balls | Fridge up to 48 hrs; freeze 2–3 months | Overnight fridge or ~5 hrs room; bake on hot stone | Cold rest firms dough and eases rolling |
| Par-baked yogurt rounds | Fridge 3–5 days; freeze 2 months | Reheat 5 mins at 200°C fan / 220°C | Par-bake seals the surface so toppings don’t sog |
| Leftover slices | Fridge 2–3 days | Re-crisp 5–7 mins on steel in a hot oven | Direct heat restores snap without drying |
- Label packages with date and prep time so you track shelf life.
- Keep a small bowl of water to loosen thickened sauce before finishing.
- Note: this post may contain affiliate tips and contain affiliate links to recommended tools to speed your workflow.
Conclusion
This post gives you a compact roadmap to pick a dough path, shape with confidence, and make pizza that’s crisp beneath and chewy at the top.
We keep it simple: weigh flour and water, mix in a bowl, shape gently with your hands, and use a bit of rice flour if the surface sticks. Par-bake on a preheated pizza stone, add sauce and cheese, then finish hot for blistered color.
Choose the three-ingredient or yeast pizza dough that fits your schedule, note times in minutes or an hour for rest, and season with a tablespoon of olive oil and a pinch of salt. This post may contain affiliate suggestions and contain affiliate links to tools that speed prep. Now grab ingredients, pick a make recipe path, and make pizza tonight.
FAQ
How do I get a crisp, chewy crust without using regular wheat flour?
Use a well-balanced gluten-free flour blend that contains rice flour, tapioca or potato starch, and xanthan gum or psyllium husk for structure. Measure by weight, hydrate the dough correctly, and par-bake the base on a preheated baking steel or stone at 500–550°F to develop a blistered, chewy edge.
Can you make a quick 3-ingredient yogurt dough and still get good texture?
Yes. A yogurt-and-flour base yields a fast, thin crust that crisps nicely. Press or roll it thin on parchment, par-bake briefly, then add sauce and toppings and finish at high heat. It won’t have the same chew as a yeast-risen crust but works great for speedy weeknight meals.
How should you store dough or par-baked crusts for later use?
Portion the dough into balls, oil lightly, and refrigerate up to 48 hours or freeze tightly wrapped up to 3 months. Par-baked crusts should cool, be wrapped in plastic, and frozen flat. Thaw in the fridge overnight before finishing on a hot stone.
What’s the best way to reheat leftovers so the base stays crisp?
Reheat in a preheated oven on a baking steel or sheet at 425–450°F for 6–8 minutes. Avoid the microwave; it makes the base soggy. For extra crisp, finish under the broiler for 30–60 seconds while watching closely.
Do you need a pizza stone or steel to get great results?
A baking steel or stone helps by holding high heat and producing a blistered bottom quickly, but a heavy-duty sheet pan inverted and preheated works if you don’t have them. Parchment under the dough makes transfer easier.
How do you prevent a sticky, high-hydration dough from tearing when shaping?
Use a light dusting of your flour blend or tapioca starch and gentle shaping with wet or oiled hands. Chill the dough briefly if it’s too soft. Work on parchment to transfer the round without stretching too much.
What toppings and sauces keep the base from becoming soggy?
Use a thinner layer of sauce, drain very wet toppings (like fresh tomatoes) and pre-cook vegetables with high water content. A quick brush of olive oil on the par-baked crust before sauce helps create a moisture barrier.
Can you make dairy-free or vegan versions that still taste great?
Absolutely. Swap yogurt in the quick dough for a plant-based thick yogurt or use a yeast-risen dough. Choose plant-based cheeses designed to melt, or use olive-oil–based sauces, roasted vegetables, and nutritional yeast for savory richness.
How long should you preheat the oven or steel for best results?
Preheat the oven with your stone or steel for at least 45 minutes at the target temperature (450–550°F). A fully heated surface prevents soggy bottoms and yields quick oven spring and charring.
What brands of flour blends and equipment are reliable for consistent outcomes?
Look for well-reviewed blends like Bob’s Red Mill 1-to-1, King Arthur Gluten-Free Measure for Measure, or Cup4Cup for predictable hydration. For equipment, Baking Steel or a quality pizza stone from Emile Henry gives reliable heat retention. Use a digital scale, bench scraper, and good parchment for best results.

